All Thou Needest is Flask, Quoth The Python in Eldritch Speech

As a first blog post, I could have written some kind of "hello world!" post as is the custom in these Internet lands. However, I would rather write some lines about the technical choices behind this very simple blog.
If this topic doesn’t pique your interest, do feel free to return later — more cyber-ish content is coming in the months ahead.
But, if you have some keen interest for web technologies and hostings puzzles, let me share with you the reasons behind what could be viewed as a curious choice of some sort.
🧙♂️ One Ring to bring them
These days, I use the markup language Markdown for everything. Combined with tools such as Obsidian and reveal.js, Markdown forms the foundation of my daily knowledge work and communication.
For long as I can remember, I've told to myself:
“I shall not start a new blog unless it uses Markdown — and draws from my Obsidian knowledge base.”
And so, I set out to build exactly that.
As an infosec practitioner, I also wanted a site that offered:
That is why I chose a solution based on Markdown and Flask, hosted on AWS.
It's not the cheapest, nor the simplest option — but it meets both my requirements.
💡 Let there be light
To build this very simple blog, I was largely inspired by James Harding's blog.
First and foremost, articles are written in Markdown and stored in a static folder with minimal metadata, as shown below:
title: All thou needest is Flask, quoth the Python in eldritch speech
date: 2025-06-23
summary: This ...

## All thou needest is Flask, quoth the python in eldritch speech

As first blog post
Flask then interprets these files using the flask_flatpages library and generates static HTML files via the flask_frozen library
Below is a snippet of what’s running under the hood:
import sys
from flask import Flask, render_template, redirect, url_for
from flask_flatpages import FlatPages
from flask_frozen import Freezer

DEBUG = True
FLATPAGES_AUTO_RELOAD = DEBUG
FLATPAGES_EXTENSION = '.md'
FLATPAGES_ROOT = 'content'
POST_DIR = 'posts'
RES_DIR = 'posts'
FLATPAGES_MARKDOWN_EXTENSIONS = ['fenced_code', 'codehilite']

minimal = Flask(__name__)
flatpages = FlatPages(minimal)
freezer = Freezer(minimal)
minimal.config.from_object(__name__)

<...>

@minimal.route('/blog/<post>/')
def post(post):
    path = '{}/{}'.format(POST_DIR,post)
    content = flatpages.get_or_404(path)
    return render_template('post.html', post=content)

if __name__ == "__main__":
    if len(sys.argv) > 1 and sys.argv[1] == "build":
        freezer.freeze()
    else:
        minimal.run(host='127.0.0.1', debug=DEBUG)
The final result is displayed through Jinja2 templates, like the one below:
{% extends 'base.html' %}
        {% block content %}
            <header>
                <nav class=nav role=navigation>
                    <div class=left>
                        <a href='{{ url_for('home') }}' title=name
                        class=navbar-item><strong>← Back to Home</strong></a>
                </nav>
            </header>
            <main>
                {{ post.html|safe }}
            </main>
        {% endblock %}
404 errors are handled by a flask method and displayed accordingly when needed.
As a bonus, you can read if you wish the project's source code on my Github page.
🚀 One man deploys an app securely
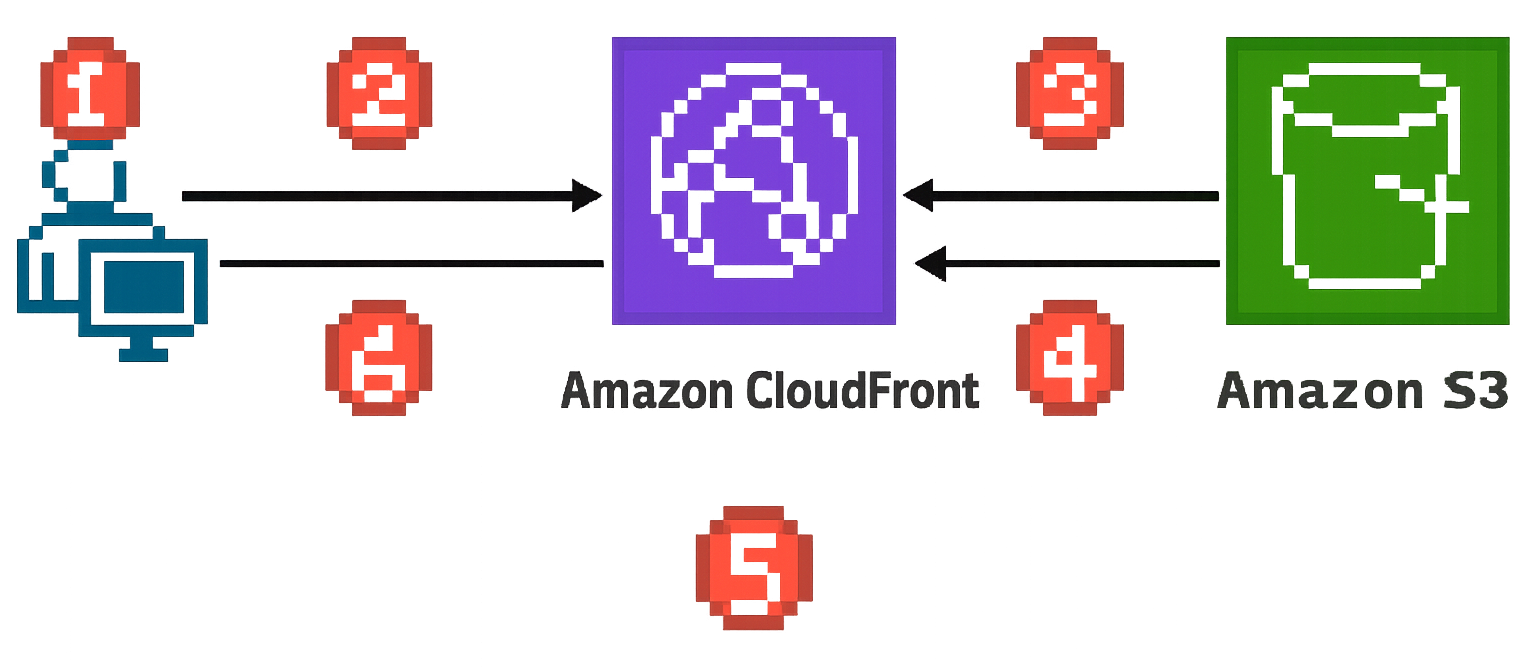
To solve the hosting puzzle, I relied on this Github project shared by AWS to streamline the deployment process. In short, the project's authors describe the solution’s inner workings using a simple diagram:
-
The viewer requests the website at www.example.com.
-
If the requested object is cached, CloudFront returns the object from its cache to the viewer.
-
If the object is not in the CloudFront cache, CloudFront requests the object from the origin (an S3 bucket).
-
S3 returns the object to CloudFront.
-
CloudFront caches the object.
-
The objects is returned to the viewer. Subsequent requests for the object that come to the same CloudFront edge location are served from the CloudFront cache.
I found three main benefits to this solution:
-
It creates an Amazon S3 bucket to host the static website content. To update the site, I simply upload new files to the bucket.
-
It provisions a CloudFront distribution with Origin Access Control (OAC), ensuring content is accessible only through CloudFront — not directly from S3.
-
It sets up an SSL/TLS certificate via AWS Certificate Manager (ACM), enabling secure HTTPS access to the website.
💻 Playing with the daunting AWS ecosystem
The deployment process is far from straightforward despite the quality of the Amazon Web Service's documentation. However, if you meet the required prerequisites and have a working AWS CLI, it should be a piece of cake - a slightly bitter one, perhaps, but cake nonetheless
- From your working directory, freeze the Flask website
$ python3 minimal.py build
- Clone and prepare the Amazon CloudFront solution from the Github project
$ git clone https://github.com/aws-samples/amazon-cloudfront-secure-static-site
$ make
$ package-static
$ make build-static
$ cd
$ cp -r <dev repo> .
$ aws s3 mb s3://your-domain --region us-east-1 --profile yourprofile
$ aws cloudformation package --region us-east-1 --template-file templates/main.yaml
--s3-bucket your-domain-static --output-template-file packaged.template --profile yourprofile
- Deploy the website with CloudFormation
$ aws cloudformation deploy --region us-east-1 --stack-name gkaplan-www-stack --template-file
packaged.template --capabilities CAPABILITY_NAMED_IAM CAPABILITY_AUTO_EXPAND --parameter-overrides
DomainName=your-domain SubDomain=www HostedZoneId=your_hosted-id --profile yourprofile
By default, your website may return 403 errors for routes other than your homepage. Let’s fix that.
- Create a function in Cloufront functions with this code to rewrite request URLs:
    async function handler(event) {
    var request = event.request;
    var uri = request.uri;

    // Check whether the URI is missing a file name.
    if (uri.endsWith('/')) {
        request.uri += 'index.html';
    }

    return request;
}
-
Add this new function in association with the current Distribution using the Viewer request Event type. The cache behavior can remain by default.
-
Delete the default 404 error page response in the current Distribution error pages configuration
-
Routing 403 errors to 404 page. Change the 403 error page response in the current Distribution error pages, as shown below:
    - Response page path: /404.html
    - HTTP response code: 404
And voilà, your static website is online and client-server communication is now TLS encrypted.